‘Is it possible for test automation tools to learn the UI of an application in the same way a real-life user learns it?’ – that was the question the Tricentis Team asked themselves when they started working on Vision AI.
Vision AI can be defined as an “intelligent” user interface (UI) test automation engine that allows automation of test scripts without the use of code. Among the application of its functionalities, one may point to situations in which defining selectors for automation purposes is impossible due to the early phase of development (when only mock-ups are available) or verification of complex structures and graphic elements on the website (e.g., maps, diagrams) is required. This tool will also provide an opportunity to involve non-technical users with crucial domain and test process knowledge.
During Vision AI development, Tricentis used machine learning as a data analysis method, thanks to which the tool’s engine, like the end user, can interpret various screens and objects available in the application. Moreover, in the event of changes to the application resulting in a test failure, the “Vision AI Self-Healing” module will allow Vision AI to “self-repair” the script based on its learned “intelligence.”
Vision AI’s engine is integrated with Tricentis Tosca tool. If you are interested in Tosca, check out the blog post (PL) on SII’s page: Czy Tosca i podobne rozwiązania codeless są przyszłością testowania?
In this article, we will discuss in more detail the use cases of Vision AI in IT projects mentioned at the beginning, focusing on the aspects that distinguish this tool from “classic” test automation frameworks.
Configuration
We must start with the configuration to prepare our environment for work with Vision AI. Preparations may be divided into a few stages:
- Registration,
- Login,
- Installation,
- Connection Configuration.
Registration
Each company/institution/project should prepare a new environment on Nexus Server. The administrator should grant access at the user’s request. After the user receives information that access has been granted – it is possible to log in to the environment.
Log in process
To log in, we will use the address: https://authentication.app.tricentis.com/
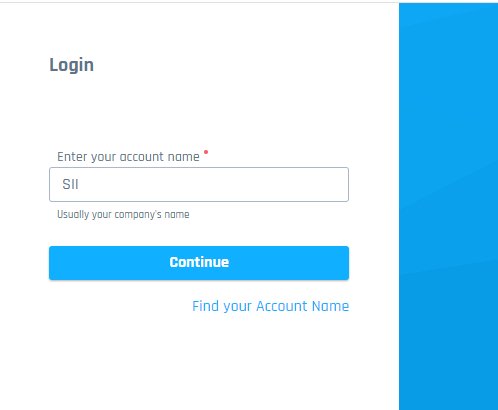
As a first step, we need to enter the Account Name – the name of our company – e. g. SII, and after that, we can click the “Continue” button.
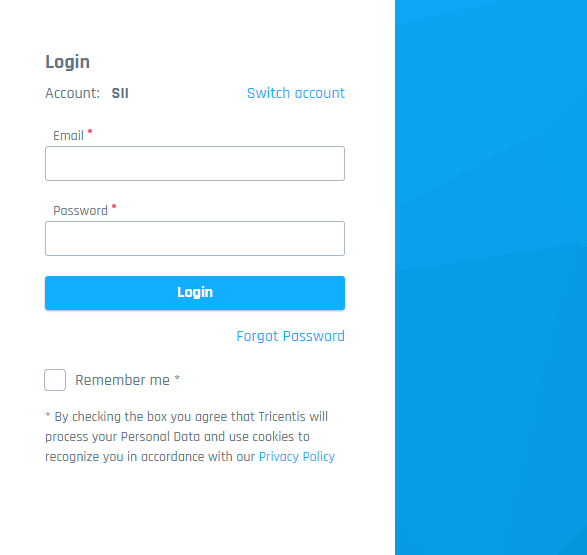
In the next step, we need to enter our e-mail and password. Additionally, we can check the option “Remember me”, and finally, we are ready to click “Login”.
After login, it is worth preparing a Token – it will be needed to connect with the Vision AI agent. Creating a token is more convenient than entering credentials with every run and allows better stability during module creation with Vision AI and test execution. To generate a Token, click the “Add new” button.
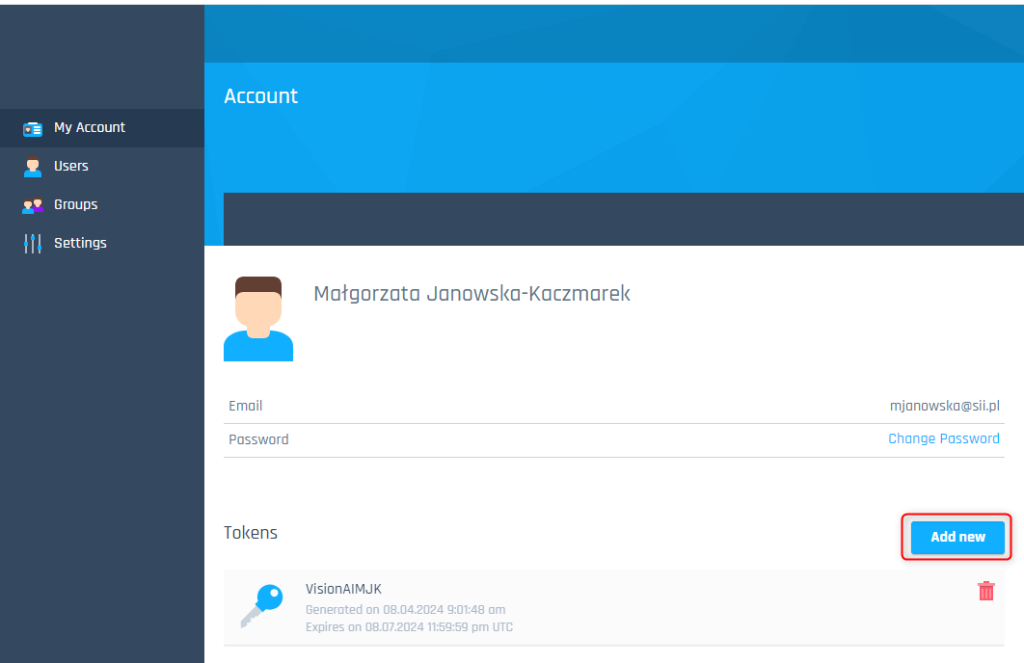
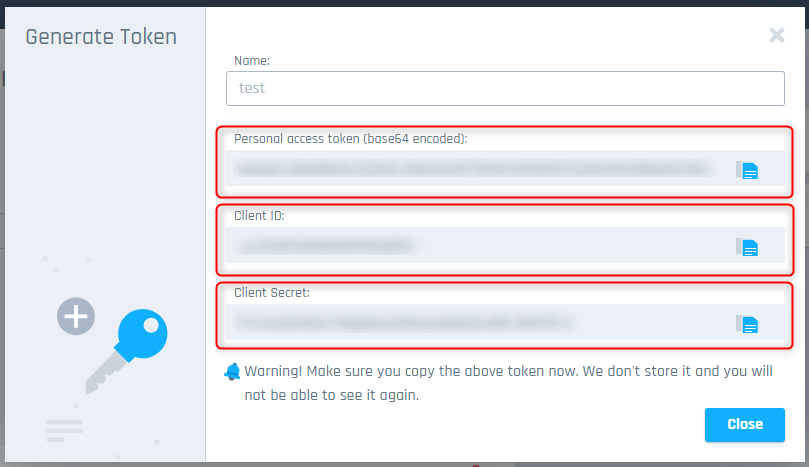
Please remember that the Token’s data is visible only during Token generation – it is essential to save this data in Notepad for future usage. If we do not do that – the Token will not be possible to use, and there will be a need to create another one (and save that Token’s data in Notepad). Please note that the token has an expiration date; after its expiration, we need to create a new one and then connect it to our services again. Still, it is a better option than entering credentials for the Vision AI agent every day 😉
Below, you can find the screen with an example token “test” with all information about the generated data – this data should be copied and saved to Notepad for future use (next to each value, you may find the “copy” icon).
Installation
During our previous work with Tosca Commander, we decided not to install Vision AI components for Tosca during Tosca Commander installation – we need to download the Tosca Commander installation file again (according to the used version) and run the installation file. Next, click the “Modify” button > “Custom Installation” button and “Next” button. On the next screen, we need to set the checkbox as “True” for Vision AI:
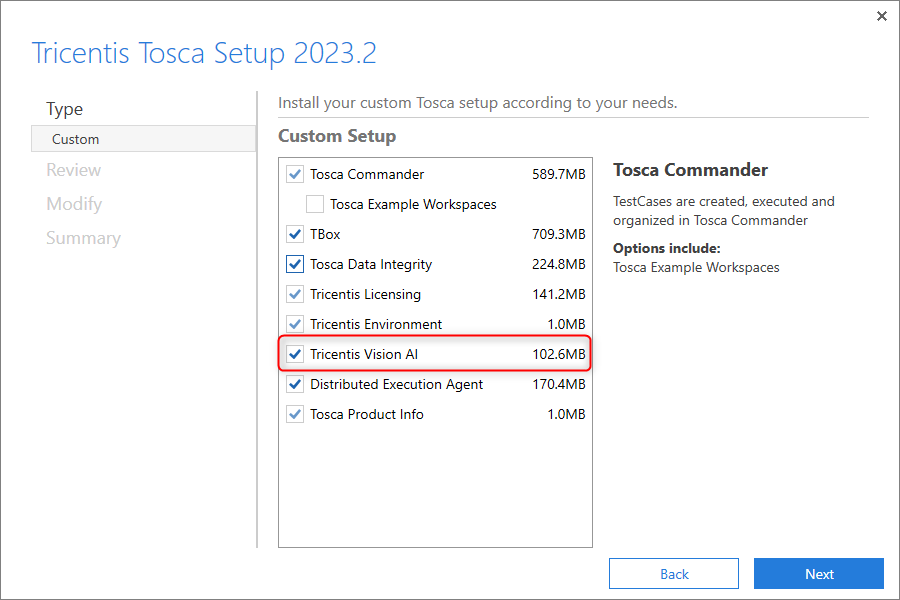
Then, we need to click on another “Next” button and confirm changes with the “Modify” button. After the installation process is finished, we should get confirmation.
Connection configuration
We need to run the Vision AI agent (it was added to Tosca Commander during installation). It is also a standalone application that will run during the Vision AI engine’s module scan and test execution, using steps prepared by the Vision AI engine.
Vision AI agent is available from the system tray – to create a stable connection using the Token, we need to right-click on the Vision AI agents’ icon and choose “Settings”:
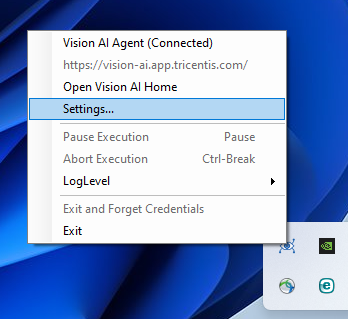
We set the correct Nexus Server Endpoint for our environment and set the connection with the previously prepared Token. We can do that using the “Set Token” button. The following stages are intuitive, and requests are displayed on the screen. If the Token was prepared before and data was saved in Notepad, we only need to paste the correct values into the fields.
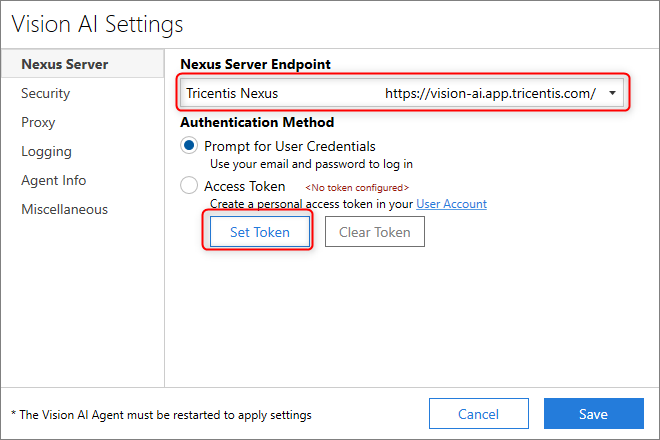
When the Token is connected with the Vision AI agent, we should close and restart it, and new settings should be loaded into the application.
If we plan to run our tests on DEX, we should ask the administrator to create an account on the Vision AI platform for the user who should log into the system during the test (e.g., a bot user). We should also generate a Token for this user, install the Vision AI agent on the VM, and connect the Vision AI agent with the Token. Adding the task of running Vision AI on the VM after Windows runs is crucial.
Important information – Vision AI will work only when connected to the Internet.
If you would like to know more about configuration, feel free to find a link to the Tricentis document and read more about Vision AI documentation.
Vision AI – use cases
There are 3 main ways to use Vision AI:
- Building steps via the Run Vision Script module.
- UI Mockup Scanning – to prepare preliminary tests before the application code is written but when the UI design is ready.
- Scanning images, graphs, and applications is challenging for classic automation. Vision AI is useful wherever standard methods of verifying data are not stable (e.g., reading data from charts saved in JPG/PNG format).
Run Vision Script module
The “Run VisionScript” module, which can be found in Standard Modules in Tosca, allows you to control the application using keywords and structures similar to “natural language”.
The example below (populate the contact form on the Sii website to verify the correctness of the validation) illustrates a simple case of using the “Run VisionScript” module in Tosca.
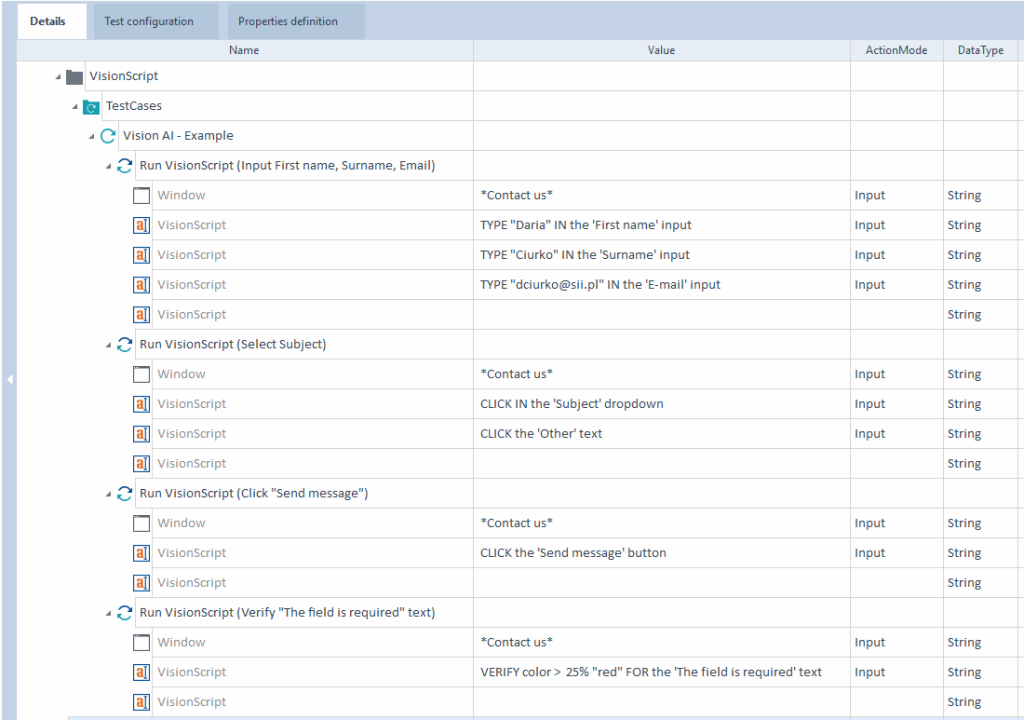
After running the script, the indicated form fields will be filled in, a category selected from the list will be clicked, and the send message button will be clicked. Finally, the script will verify the content and color of the message about incorrect form completion.
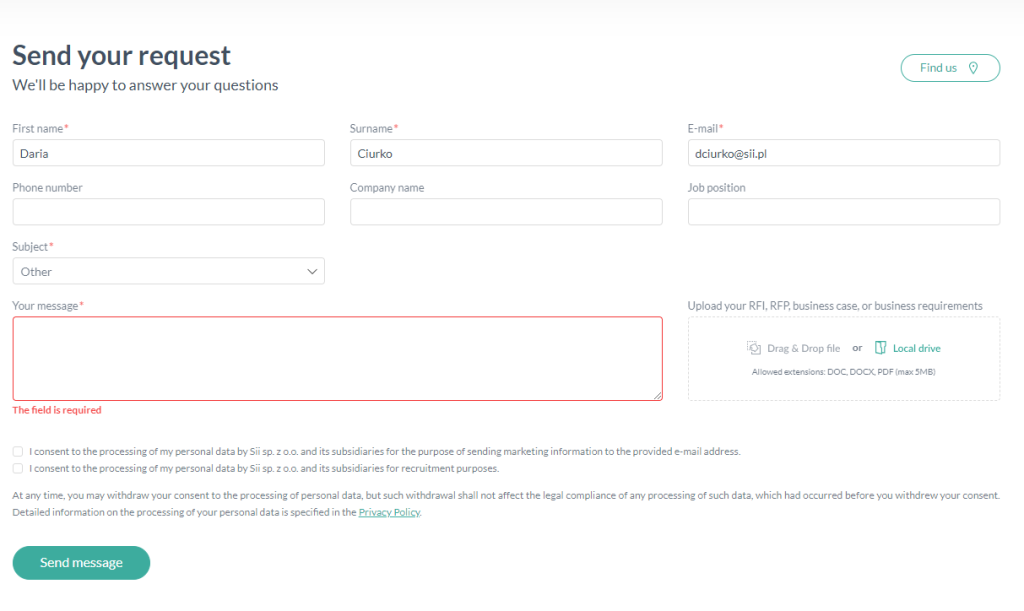
The structure of the “Run VisionScript” module
Let’s take a closer look at the structure of the “Run VisionScript” module. We must indicate the name of the tested application each time in the module. Then, using keywords, we perform specific testing steps on the page. Let’s analyze some examples:
- “TYPE “Daria” IN the ‘First name’ input” – enter the phrase “Daria” into the input field labeled “First name.”
- “CLICK IN the ‘Subject’ dropdown” – click (in this case, expand) the dropdown item named ‘Subject.’
- “CLICK the ‘Send message’ button” – click the ‘Send message’ button.
- “VERIFY color> 25% “red” FOR the ‘The field is required’ text” – the “VERIFY” keyword enables verification. In this example, we verify whether more than 25% of the pixels in the displayed text are red.
A detailed description of all keywords can be found in the Vision AI documentation.
Mock-up scanning
In the IT world, the “Shift Left” concept is gaining more and more popularity; it involves shifting tasks related to quality assurance to the initial stages of the software development process. Thanks to this action, we can detect and solve problems earlier (e.g., inconsistency of requirements). And as we know, the sooner the problem is found, the cheaper it is to repair it.
The engine of the Vision AI tool can interpret graphic objects, which allows us to create tests even before the real application and its code are ready. We only need mock-ups to create the first tests.
Graphics from freepik.com (“Gradient UI/UX elements collection”) were used to demonstrate the operation of the Vision AI engine.
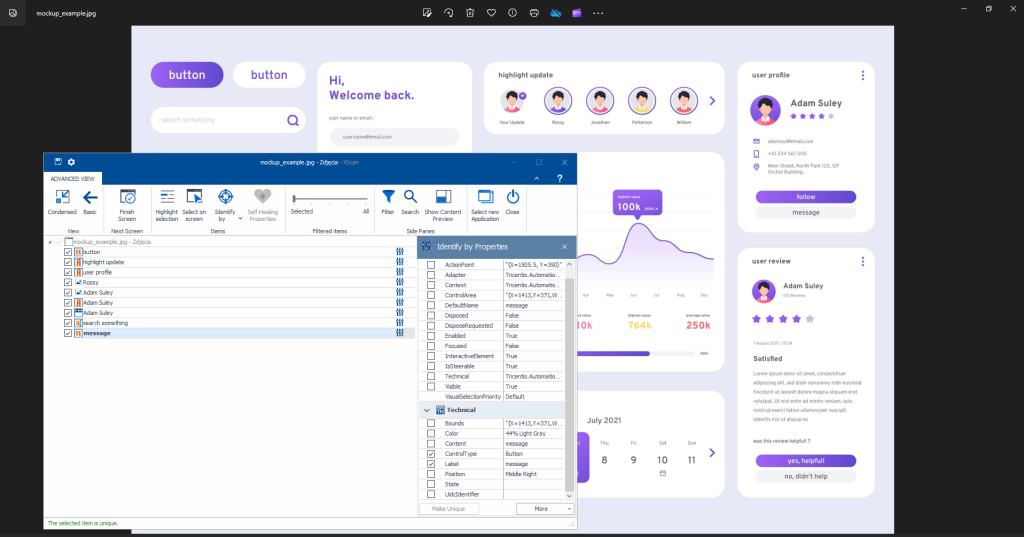
The screenshot above shows how effectively Vision AI coped with the mockup, which was based only on a JPG file. Let’s consider the presented example, XScan in Tosca correctly recognized elements such as:
- the “button” element visible in the upper left corner,
- section heading “highlight update”
- “user profile” section header,
- graphics: photo of “Rossy” in the “highlight update” container and “Adam Suley” visible in the “user profile”
- input field “search something”
- “message” button to send a message to Adam Suley
An example “user profile” section was scanned using the Vision AI engine, and a module was created in Tosca. Then, a test step was prepared using the module.
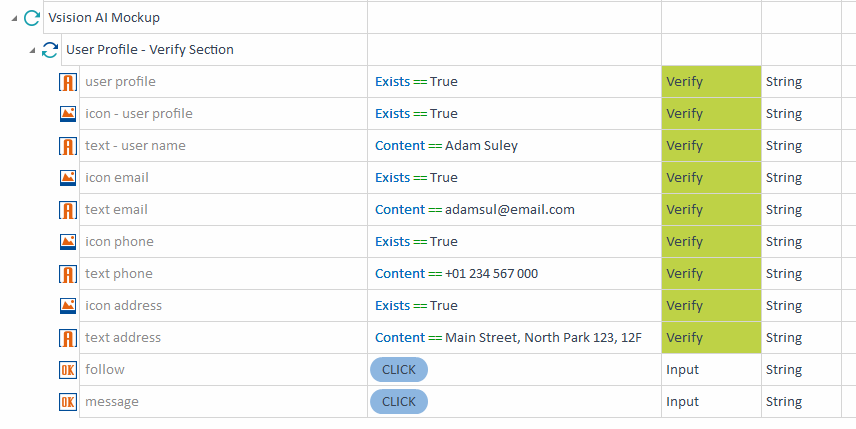
The visibility of all graphic elements and texts was verified. It was also checked whether it is possible to click the buttons “follow” and “message.” The screenshot below shows the test execution results summarized in the Execution List in Tosca.
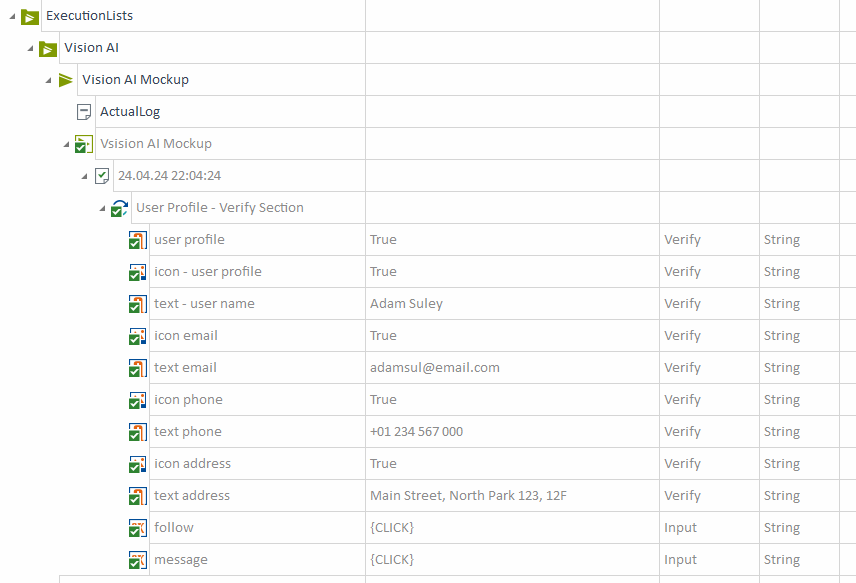
Pre-tests prepared in this way can significantly facilitate communication with analysts and businesses and significantly speed up the process of building target tests in the subsequent stages of application development.
Scanning graphic elements
Vision AI can help with test automation of non-standard elements – like gathering data from a map or a graph with data.
There is only one condition – the image/graph/map should be visible clearly, with good image sharpness and resolution. Vision AI utilizes the same rules as humans to read data from those artifacts. If the object on the image is blurred, it is risky that the correct modules and tests will not be possible. In this situation, we cannot handle automation even when supported by the newest technologies.
Vision AI is also a good option for applications with a nice UI but low-quality code and many non-standardized solutions, which makes it difficult to create automation scripts with standard tools.
Example of a test case performing data verification by Vision AI
Below is an example of a test case performing data verification by Vision AI:
Environment:
Chrome (version 124.0.6367.62), incognito mode.
Test Data:
Article Category: Development na miękko (Eng: Development – the soft way)
Article Subcategory: Salesforce
Title: Odkrywanie potencjału Salesforce Maps – przegląd narzędzia (Eng: Discovering the potential of Salesforce Maps)
Author of article: Michał Najdora
Publication date: February 23, 2024
Image Description: Ryc. 2 Salesforce Maps – klienci z różnych regionów ze zróżnicowanym sposobem wyświetlania (znaczniki, heatmapa, klastry) (Eng: Image 2 Salesforce Maps – clients from different regions with diverse displaying settings (tags, heatmap, clusters).
City: Gdańsk (Gdansk on map)
Steps:
- Open page https://sii.pl/ in Chrome browser.
- Accept all cookies on the page.
- Verify if the link to the Blog is visible.
- Click on the link to the Blog.
- Select the correct category for the article.
- Click “See more” for article’s subcategory section.
- Select the correct subcategory for the article.
- Verify if the correct article is visible on the list (verify title, author, category, publication date).
- Click the article’s link.
- In the article, search for an image with a description that matches test data.
- Verify if the image is visible.
- Verify image elements: The “Layers” icon and the “Save Changes” icon are visible. Move the mouse pointer to the City name buffered from test data.
- Close browser.
- Delete all used buffers.
Step 12 will be executed with the module prepared with the Vision AI engine.
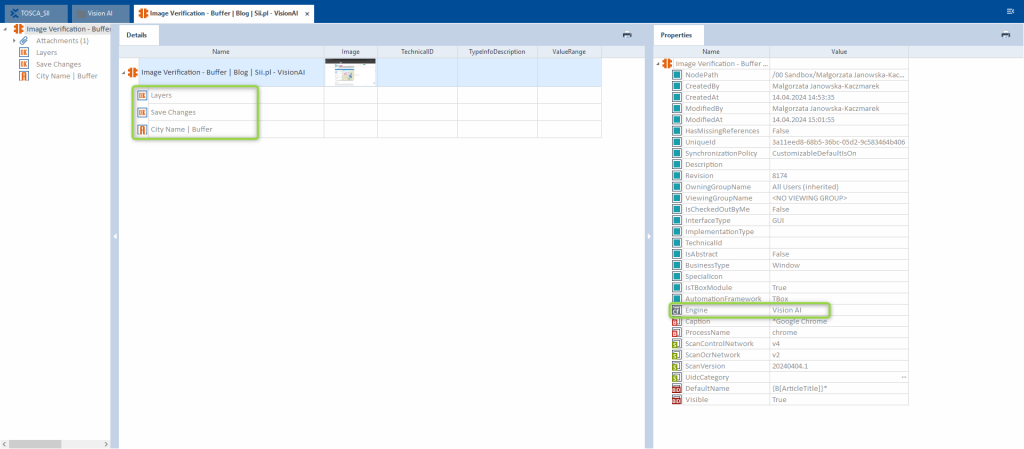
During scanning images by the Vision AI engine, we can recognize standard elements like the buttons mentioned before and objects on the map, such as cities and river names. From our image, we can read a few city names – so for the Reusable Test Step Block, we added the Business Parameter “City” and connected it with a buffer with the same name – so we can set different city names than from Test Data (e. g. “Wroclaw”). Also, they will be found on the map.
Below, you can find the test execution recording.
Vision AI Self-Healing functionality
Because Vision AI uses machine learning as a data analysis method and can interpret UI elements like a “real” application user, it was possible to introduce “self-healing” functionality into the tests.
To enable the Vision AI Self-Healing mechanism, you must allow the application to store test history in the cloud. This will allow Vision AI to analyze images from test runs, “learn” the interface, and create several stable alternatives to find application elements used in the test.
The next step is to search for the “Vision AI Self-Healing” module and add it as a Test Step in the Recovery Scenario in Tosca, as illustrated in the screenshot below.

Using the form submit button example presented earlier in the article, let’s consider a situation in which the “self-repair” test mechanism may work. If this button changes color or position, Vision AI will still be able to recognize the item correctly. Dynamic IDs or changing class names will also not prevent the tool from correctly identifying the button.
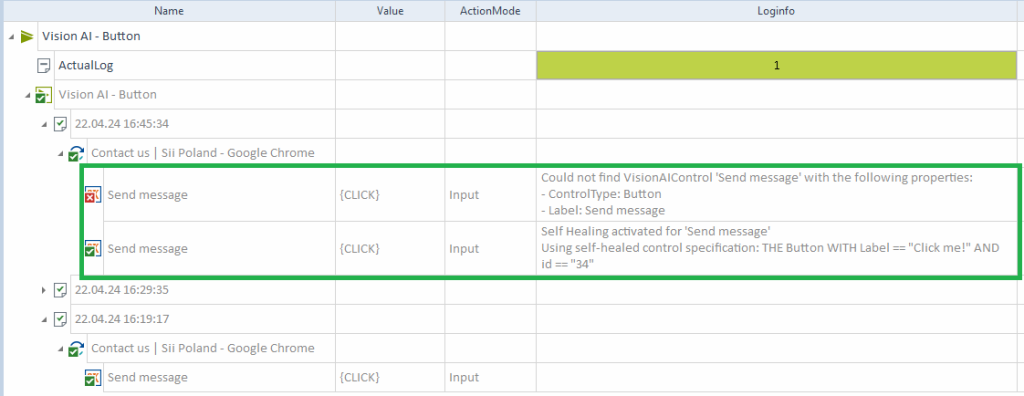
To demonstrate the “self-healing” mechanism, we have changed the appearance of the button at the bottom of the form, as shown in the screenshot below.

The following have changed: id, name, classes responsible for the size and color of the element, and the button label. Tosca could not find the button in the first iteration, so the “self-healing” mechanism was triggered. The “Vision AI Self-Healing” module worked correctly, and despite the changes introduced, Tosca managed to click the button in the second iteration.
Sandbox (VisionAI assistant)
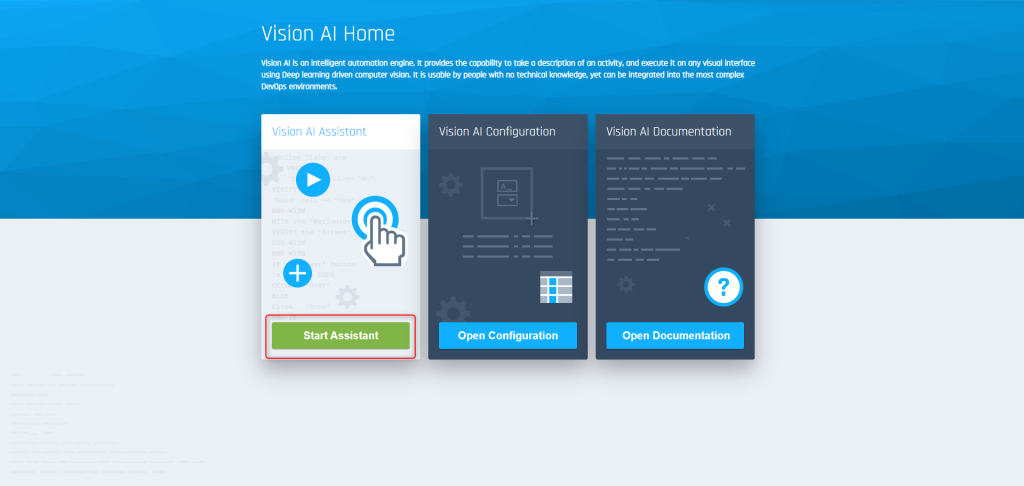
If you are unfamiliar with Vision AI possibilities – do not worry – Tricentis gives us Sandbox – a Vision AI assistant that allows us to check many Vision AI options and solutions. The environment is available in the same way as for other components of Vision AI – the administrator should create an account for us (link to the environment).
Aafter opening the page, please click “Start Assistant”:
After that, select the Vision AI agent from the list (its name will be correlated with our computer’s).
After running the correct Vision AI agent, all windows with applications are loaded into the list of “visible” elements for Vision AI. We can choose one from the list and start to build our script based on visible elements.
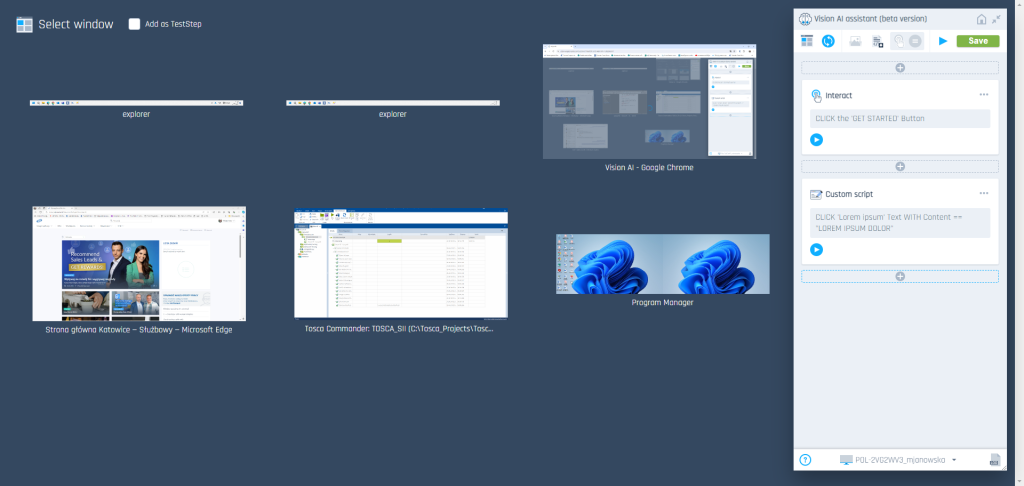
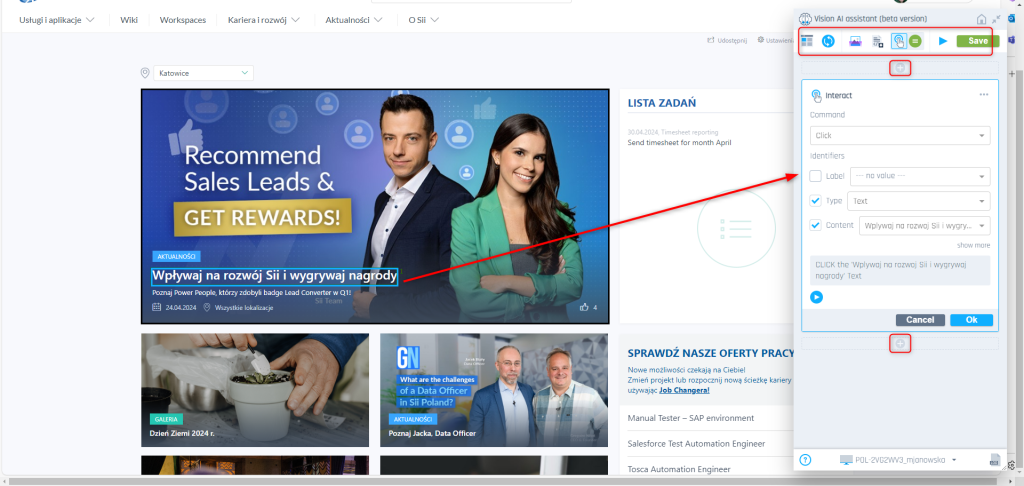
If we select one of the elements, we can edit its loaded values and add steps before and after it. Our options are:
- select window,
- reload view,
- scan image,
- import script,
- set an interactive mode for the element (click, enter, save),
- verify,
- run the script,
- save the script, and more.
We can return at any time to our Sandbox (Vision AI assistant), and prepared steps will be saved and available.
Every added step can be:
- edited,
- deleted,
- copied,
- cut,
- moved up/down, and more.
We can add various steps like loops:
- IF,
- WHILE,
- REPEAT UNTIL,
- WAIT UNTIL,
- TRY FAILURE,
- WITH.
We can also import the script in “.vs” format as a step. There are plenty of possibilities, and it is worth individually exploring more to understand Vision AI’s purpose of use.
Vision AI limitations
As with all tools – Vision AI also has its limitations – Tricentis pointed out a few of them:
- Text recognition cooperates with the English alphabet, so Non-English letters/signs may not be correctly interpreted – examples: polish language: ą, ę, ł, ó, ś, ć, ż, ź, dź, dż. Other than Latin, alphabets will not be operated at all (e.g., Arabic, Cyrillic, Kanji, Hanji).
- With Vision AI’s help, we cannot steer windows reserved for Windows Operating System administrators.
- Elements invisible on the UI will not be available for Vision AI. First, we need to scroll the page down (use a non-Vision AI module) or move to the correct view to allow Vision AI to verify the elements. Typical modules/steps may be used to achieve this.
- Vision AI may struggle with table steering – especially if not all rows/columns are visible on one page/area/view.
- Vision AI learns from provided data, so at the beginning of using this tool, it is possible that objects will not be recognized correctly – this time, it should be calculated in the testing process. The more executions, the more correct recognitions.
Summary
Vision AI is a promising tool that helps build tests where using standard tools is difficult. Of course, it will not be the best option for all projects and will not replace test developers because the test steps need to be built with an understanding of business processes. Vision AI unblocks areas where only manual testing was available until now. Other automation engines available in Tosca Commander are faster and more reliable for “standard” scenarios.
Using Vision AI allows us to create the first draft of steps in situations where development is not finished yet – like when only UI mock-ups are available. True, modules created using mock-ups may need updates in the future, but a lot of time will be saved. For a few types of projects, this solution will be an advantage and a game-changer for test developers.
It is worth checking Vision AI’s possibilities on your own and becoming a “friend” with this tool will help you with your daily work.


